TensorFlow lets you use deep learning techniques to perform image segmentation, a crucial part of computer vision. There are many ways to perform image segmentation, including Convolutional Neural Networks (CNN), Fully Convolutional Networks (FCN), and frameworks like DeepLab and SegNet.
In this article, we’ll explain the basics of image segmentation, provide two quick tutorials for building and training your models in TensorFlow.
Image Segmentation in Deep Learning: Concepts and Techniques

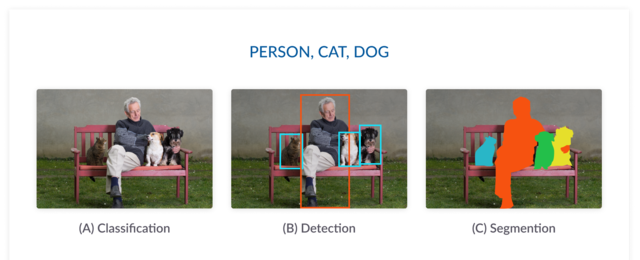
Image segmentation involves dividing a visual input into segments to simplify image analysis. Segments represent objects or parts of objects, and comprise sets of pixels, or “super-pixels”. Image segmentation sorts pixels into larger components. There are three levels of image analysis:
Classification – categorizing the image into a class such as “people”, “animals”
Object detection – detecting objects within an image and drawing a rectangle around them
Segmentation – identifying parts of the image and understanding what object they belong to
There are three types of segmentation:
Semantic Segmentation which classifies pixels of an image into meaningful classes
Instance Segmentation which identifies the class of each object in the image and overlapping of segment is allowed
Panoptic Segmentation also identifies the class of each object in the image and overlapping of segment is NOT allowed

The following deep learning techniques are commonly used to power image segmentation tasks:
Convolutional Neural Networks (CNNs) – segments of an image can be fed as input to a CNN, which labels the pixels. The CNN cannot process the whole image at once. It scans the image, looking at a small “filter” of several pixels each time.
Fully Convolutional Networks (FCNs) – FCNs use convolutional layers to process varying input sizes. The final output layer has a large receptive field and corresponds to the height and width of the image, while number of channels corresponds to number of classes. FCNs classify every pixel to determine image context and location of objects.
DeepLab – an image segmentation framework that helps control signal decimation (reducing the number of samples and data the network must process), and aggregate features from images at different scales. DeepLab uses a ResNet architecture pre-trained on ImageNet for feature extraction. It uses a special technique called ASPP to process multi-scale information.
SegNet neural network – an architecture based on deep encoders and decoders, also known as semantic pixel-wise segmentation. It involves encoding an input image into low dimensions and recovering it, leveraging orientation invariance in the decoder. This generates a segmented image at the decoder.
Quick Tutorial #1: FCN for Semantic Segmentation with Pre-Trained VGG16 Model
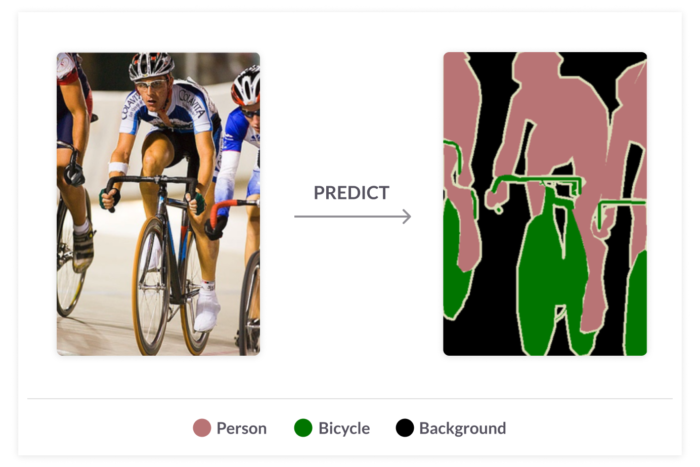
The images below show the implementation of a fully convolutional neural network (FCN). Input for the net is the RGB image on the right. The net creates pixel-wise annotation as a matrix, proportionally, with the value of each pixel correlating with its class, see the image on the left.

Now let begin with our first example, you can download the code from Link below and follow instructions there after,
Github Source Code Link: TensorFlow
Begin by downloading a pre-trained VGG16 model from Google drive Link here or Direct Link here, and add the /Model_Zoo subfolder to the primary code folder.
The steps below are summarized,
1. Training
In: TRAIN.py
- Set folder of the training images in
Train_Image_Dir - Set folder for the ground truth labels in
Train_Label_DIR - Download a pretrained VGG16 model and put in
model_path - Set number of classes/labels in
NUM_CLASSES - Run training script
2. Predicting pixelwise annotation using trained VGG network
In: Inference.py
- Set the Image_Dir to the folder where the input images for prediction are located.
- Set the number of classes in
NUM_CLASSES - Set folder where you want the output annotated images to be saved to Pred_Dir
- Run script
3. Evaluating network performance using Intersection over Union (IOU)
In: Evaluate_Net_IOU.py
- Set the
Image_Dirto the folder where the input images for prediction are located - Set folder for ground truth labels in
Label_DIR. The Label Maps should be saved as PNG image with the same name as the corresponding image and png ending - Set number of classes number in
NUM_CLASSES - Run script
Quick Tutorial #2: Modifying the DeepLab Code to Train on Your Own Dataset
DeepLab is semantic image segmentation technique with deep learning, which uses an ImageNet pre-trained ResNet as its primary feature extractor network. The new ResNet block uses atrous convolutions, rather than regular convolutions.
Prerequisites: Before you begin, install one of the DeepLab implementations in TensorFlow.
Github Source Code Link : DeepLab2
DeepLab2 is a TensorFlow library for deep labeling, aiming to provide a unified and state-of-the-art TensorFlow codebase for dense pixel labeling tasks, including, but not limited to semantic segmentation, instance segmentation, panoptic segmentation, depth estimation, or even video panoptic segmentation.
Deep labeling refers to solving computer vision problems by assigning a predicted value for each pixel in an image with a deep neural network.
For further reading and research you can visit following Github Link DeepLab2
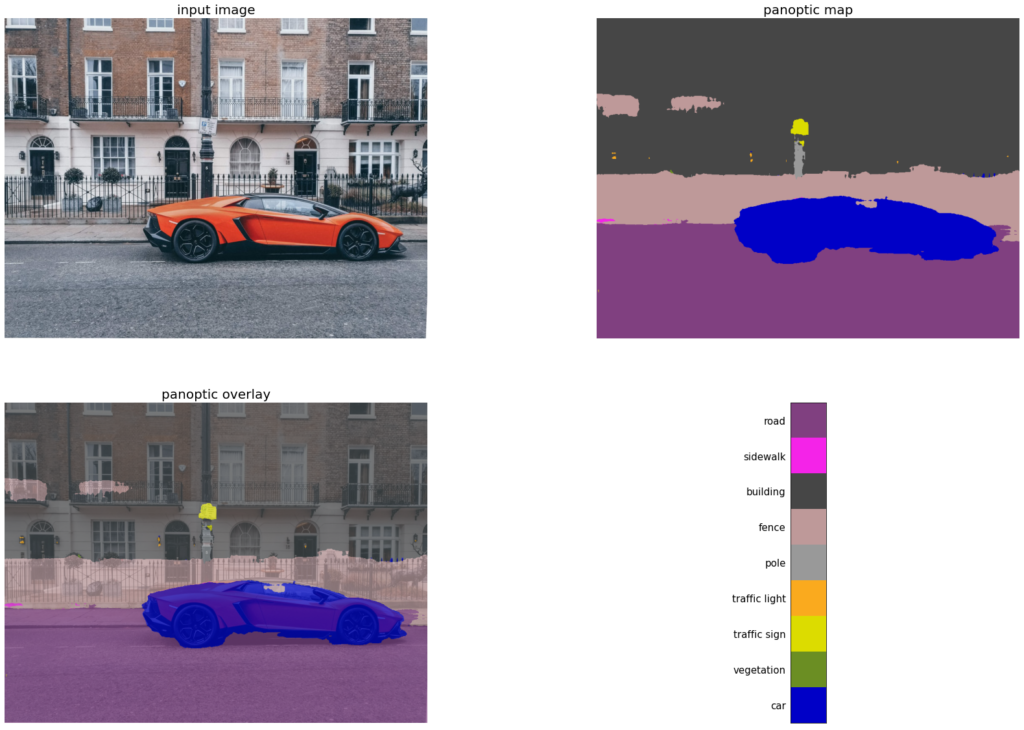
For this article we will use Demo Google Colab Notebook for built by the DeepLab2 library to perform dense pixel labelling tasks built by the DeepLab2 library to perform dense pixel labeling tasks. The models used in this colab perform panoptic segmentation, where the predicted value encodes both semantic class and instance label for every pixel (including both ‘thing’ and ‘stuff’ pixels).
Google Colab Link : https://colab.research.google.com/github/google-research/deeplab2/blob/main/DeepLab_Demo.ipynb
The following is a summary of tutorial steps:
Step1 : Import and helper methods
Steps2 : Define Functions
Creates a label colormap used in CITYSCAPES segmentation benchmark.
Returns: A 2-D numpy array with each row being mapped RGB color (in uint8 range).
Pertrubs the color with some noise.
If `used_colors` is not None, we will return the color that has not appeared before in it.
Args: color: A numpy array with three elements [R, G, B]. noise: Integer, specifying the amount of perturbing noise (in uint8 range). used_colors: A set, used to keep track of used colors. max_trials: An integer, maximum trials to generate random color. random_state: An optional np.random.RandomState. If passed, will be used to generate random numbers.
Returns: A perturbed color that has not appeared in used_colors.
Helper method to colorize output panoptic map.
Args: panoptic_prediction: A 2D numpy array, panoptic prediction from deeplab model. dataset_info: A DatasetInfo object, dataset associated to the model. perturb_noise: Integer, the amount of noise (in uint8 range) added to each instance of the same semantic class.
Returns: colored_panoptic_map: A 3D numpy array with last dimension of 3, colored panoptic prediction map. used_colors: A dictionary mapping semantic_ids to a set of colors used in `colored_panoptic_map`
Step3: Select a pretrained model
Step4: Load pretrained Model
Step5: Run on sample images
a) Required to upload an image from your local machine., Click Choose file and select the image
b) Run next block of code and it will display Segmented image with labels


